
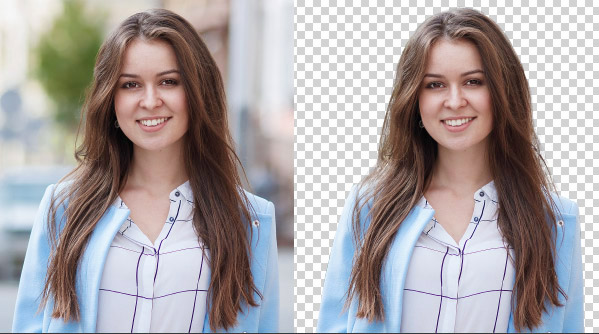
Removing the background from an image can be a useful skill, whether you’re creating professional designs, product images, or just enhancing your photos. Fortunately, with the right tools and techniques, it’s easier than ever remove bg to remove unwanted backgrounds from your images. In this step-by-step guide, we’ll walk you through the process using simple methods that anyone can follow, even without advanced graphic design experience.
Step 1: Choose the right Tool
The first step is to select a tool that suits your needs. There are many online platforms and software options available for removing image backgrounds, such as Adobe Photoshop, GIMP, or free online tools like Remove. bg and Canva. If you’re looking for a quick and simple solution, online tools are the best option since they automate most of the process. However, if you want more control over the results, Photoshop or GIMP offers more advanced features.
Step 2: Upload Your Image
Once you’ve chosen your tool, the next step is to upload the image you want to edit. For online tools, this usually involves clicking an “Upload” button or dragging the image directly into the browser. Make sure your image is high quality and that the subject has clear edges, as this will make the background removal process more accurate.
Step 3: Let the Tool Work Its Magic
If you’re using an automatic tool like Remove. bg, the platform will usually detect the subject of the image and remove the background in just a few seconds. This is perfect for those looking for a quick, no-fuss solution. For more complex images, you might need to make manual adjustments later, but most tools offer easy-to-use editing features to refine the results.
Step 4: Refine the Edges
While automated tools are fast and convenient, they may not always perfectly cut out the subject, especially around the edges. To ensure a clean finish, you may need to refine the edges manually. Most software, like Photoshop or GIMP, provides a “brush” or “eraser” tool that allows you to smooth out rough edges or restore any parts of the image that were accidentally removed.
Step 5: Save your Image
After ensuring your image looks perfect, it’s time to save it. Most tools will offer several file format options, such as PNG, JPG, or TIFF. If you need a transparent background, make sure to save the image in PNG format, as this supports transparency. Download the edited image, and you’re ready to use it for your project!
Step 6: Use Your Image in your Designs
Now that you have a clean, background-free image, you can easily integrate it into other designs, presentations, or marketing materials. Whether you’re creating a website banner, an ad, or a product listing, having images with a transparent or custom background can help your visuals stand out.
Conclusion
Removing image backgrounds is a simple yet powerful way to improve your photos or designs. By following this step-by-step guide, you can easily remove unwanted backgrounds, whether you’re working with online tools or professional software. With the right tools and a little practice, you’ll be able to create professional-looking images in no time!